When exporting sheets from Revit to PDF using the Sheet Export plugin, users may encounter font display issues (e.g., some characters may appear incorrectly). This issue specifically affects the Gost Common font.
Solutions:
1. Reinstalling the Gost Common Font
One possible cause of the issue is using an outdated version of the font. In this case, it is recommended to reinstall the font following the instructions provided by BIM2B.
2. Using Printing Instead of Exporting
If the issue persists even after reinstalling the font, an alternative solution is to configure output via printing instead of exporting. To do this, select Print to PDF in the plugin settings:
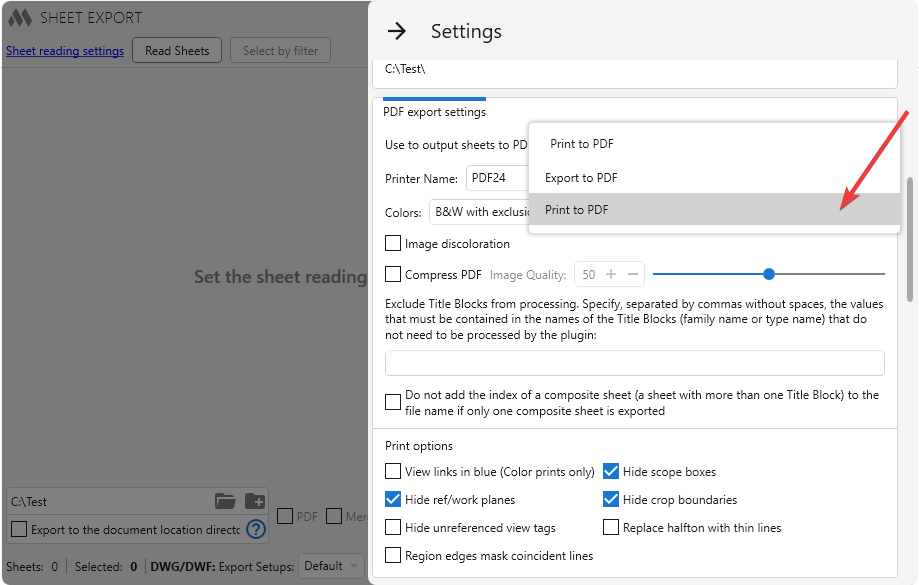
For other fonts, if they are displayed incorrectly, it is recommended to use the Print to PDF mode or select a different font.
Comments
Earlier we had a post about Origin in PlanarFace, where we wrote that Origin may not be within the PlanarFace plane contour boundaries. And recently we came across another undocumented aspect of Revit API, which in some cases can lead to incorrect operation of the intended algorithm. And this aspect is the Origin property of a Line obtained by the Solid.IntersectWithCurve method.
Let's describe it by example: let's create an element with a solid body in an empty project and take its Solid:
var uiDoc = commandData.Application.ActiveUIDocument;
var doc = uiDoc.Document;

var element = doc.GetElement(uiDoc.Selection.PickObject(ObjectType.Element));
var solid = (Solid)element
    .get_Geometry(new Options { DetailLevel = ViewDetailLevel.Fine })
    .GetTransformed(Transform.Identity)
    .First(e => e is Solid { Volume: > 0 });
Since we used a column for the example, we know for sure that it has an insertion point. Let's take this point and use it to create a long auxiliary Line:
var pt = ((LocationPoint)element.Location).Point;
var helpLine = Line.CreateBound(
    pt - (XYZ.BasisZ * 1000),
    pt + (XYZ.BasisZ * 1000));
Then we use the Solid.IntersectWithCurve method and get a Line located inside the Solid of our element:
var result = solid.IntersectWithCurve(
    helpLine,
    new SolidCurveIntersectionOptions { ResultType = SolidCurveIntersectionMode.CurveSegmentsInside });
var insideLine = (Line)result.GetCurveSegment(0);
So, if we now look at the properties of this Line, we see that its Origin remains the same as the original auxiliary Line! And if you take the parameters of this Line at the beginning and at the end, you will get not the most expected values:
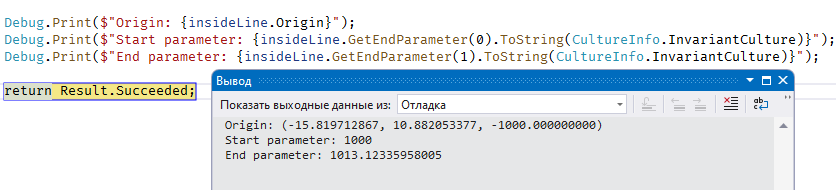 While there are not many cases where this can negatively affect the algorithm, there are still cases. Therefore, it is better to know about this feature in advance
Comments
When using the Apartment Typology plugin, a number of parameters containing the results of the plugin are created in the project.
In order to display the areas obtained with the "Apartment Typology" plugin using ModPlus parameters in the marker, you should perform the following actions:
- In the plugin window on the Parameters tab, open the list of ModPlus parameters in Notepad
- These parameters can be added to an existing shared parameter file (SPF) or a new SPF can be created with ModPlus parameters only
- Next, open the brand family and for each brand replace the existing parameters with the corresponding ModPlus parameters.
- Load the brand family into the project
Let's consider the above steps on the example of editing ADSK_Марка_Помещение_Квартира.
Comments
Read more: Revit. Creating a room mark based on the parameters of the plugin "Apartment Typology"


")
")